App development with NativeScript
At the beginning of the year I wrote a blog post about native cross-platform app development with Flutter.¹ Now, in the course of my dual studies at the HWR Berlin², I had the opportunity to try out another app development framework together with a fellow student: NativeScript.
NativeScript is an OpenSource framework developed by Telerik. It promises the development of completely native applications based on web technologies (HTML, CSS and Javascript). Popular web frameworks like Angular and Vue are also supported by NativeScript. For my fellow student and me, this came in handy because we both have some experience with Angular and wanted to use this experience in the development. In the end, it wasn’t supposed to be that easy. Without anticipating too much, NativeScript cannot translate an Angular application 1:1 into a mobile smartphone app. The differences and similarities between the frameworks are described in the following article.
The project setting and the initial setup
I would like to build a small application with you that loads ten random soccer games via the API of the OpenLiga-DB³ and displays them in a list. When you click on a game, a new page should appear which shows details about this game. For this I use NativeScript with the Angular integration. A basic understanding of Angular is certainly an advantage. I also assume that you have NativeScript already installed. If not, the installation process is very simple and well described at https://v7.docs.nativescript.org/.
Initial setup:
Initialise the project with
tns create angular-soccer-app -–ngChange with
cd angular-soccer-appinto the app folder and please test with the command
tns previewTo run the app on a device, two apps are required:
- NativeScript PlayGround
- NativeScript Preview.
Use the PlayGround app to scan the QR code generated by the “tns preview” command. After the scan, open the preview app to test the application.
NativeScript offers a very simple way to test applications quickly with a so-called cloud build, without having to set up the entire Android SDK and an emulator beforehand, as in Flutter, for example.
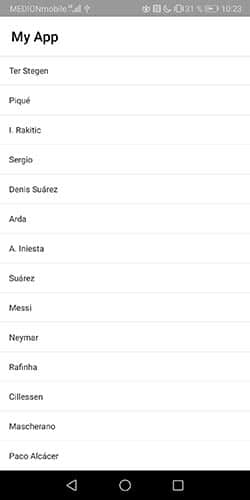
The result should look like this on the device:
During initialisation, NativeScript creates a sample application that you are currently seeing. But I want to start from scratch, so please delete the item folder (angular-soccer-app/src/app/item) and adjust the app-routing.module and app-module as follows:
app-routing.module.ts
import { NgModule } from "@angular/core";
import { NativeScriptRouterModule } from "nativescript-angular/router";
import { Routes } from "@angular/router";

const routes: Routes = [
];

@NgModule({
    imports: [NativeScriptRouterModule.forRoot(routes)],
    exports: [NativeScriptRouterModule]
})
export class AppRoutingModule { }
app.module.ts
// WICHTIG
import { NativeScriptHttpClientModule } from "nativescript-angular/http-client";

import { NgModule, NO_ERRORS_SCHEMA } from "@angular/core";
import { NativeScriptModule } from "nativescript-angular/nativescript.module";

import { AppRoutingModule } from "./app-routing.module";
import { AppComponent } from "./app.component";

@NgModule({
    bootstrap: [
        AppComponent
    ],
    imports: [
        // WICHTIG
        NativeScriptHttpClientModule,
        NativeScriptModule,
        AppRoutingModule
    ],
    declarations: [
        AppComponent
    ],
    providers: [],
    schemas: [
        NO_ERRORS_SCHEMA
    ]
})
/*
Pass your application module to the bootstrapModule function located in main.ts to start your app
*/
export class AppModule { }
Note: To use the Angular http client in NativeScript, you must first import the NativeScriptHttpClientModule. Interestingly, the corresponding NativeScript documentation does not provide a corresponding hint, but I know from my own experience that it does not work without the import.
Implementation of the list component
An advantage of NativeScript is that any project created using the NativeScript CLI can also work with the Angular CLI commands.
This means that you can create the list component as usual with
ng generate component games-listso that a new folder with the component is created. In the app-routing.module you now add the component:
app-routing.module.ts
import { NgModule } from "@angular/core";
import { NativeScriptRouterModule } from "nativescript-angular/router";
import { Routes } from "@angular/router";
import { GamesListComponent } from "./games-list/games-list.component";

const routes: Routes = [
    {path: 'games-list', component: GamesListComponent},
    {path: '', redirectTo: '/games-list', pathMatch: 'full'},
    {path: '**', component: GamesListComponent }

];

@NgModule({
    imports: [NativeScriptRouterModule.forRoot(routes)],
    exports: [NativeScriptRouterModule]
})
export class AppRoutingModule { }
Now it’s time to load the data from the OpenLigaDb and display it as a list. To do this, create the GameService with the command
ng generate service gameInitialise it as follows:
game.service.ts
import { Injectable } from '@angular/core';
import { Observable, from } from 'rxjs';
import { map, toArray, mergeMap } from 'rxjs/operators';
import { HttpClient } from '@angular/common/http';
import { Game } from './games-list/game.type';

@Injectable({
  providedIn: 'root'
})
export class GameService {

  constructor(private http: HttpClient) { }

  public getGames(): Observable<Game[]> {
    const randomGameIds = this.getRandomNumbers();
    return from(randomGameIds).pipe(
      mergeMap((gameId) => this.http.get<any>(`https://www.openligadb.de/api/getmatchdata/${gameId}`).pipe(
        map((val) => {
          return { homeTeam: val.Team1.TeamName, awayTeam: val.Team2.TeamName, homeTeamScore: val.MatchResults.length > 0 ? val.MatchResults[0].PointsTeam1 : undefined, awayTeamScore: val.MatchResults.length > 0 ? val.MatchResults[0].PointsTeam2 : undefined, date: new Date(val.MatchDateTimeUTC), league: val.LeagueName, matchday: val.Group.GroupName }
        })
      ))
    ).pipe(toArray());
  }

  private getRandomNumbers(): number[] {
    const numbers = [];
    for (let i = 0; i < 10; i++) {
            numbers.push(Math.floor(Math.random() * (100 - 1 + 10) + 10));
    }
    return numbers
  }
}
Now you can call the games-list component and load all games:
games-list.component.ts
import { Component, OnInit } from '@angular/core';
import { GameService } from '../game.service';
import { Game } from './game.type';

@Component({
  selector: 'ns-games-list',
  templateUrl: './games-list.component.html',
  styleUrls: ['./games-list.component.css'],
  moduleId: module.id,
})
export class GamesListComponent implements OnInit {

  public games: Game[] = [];

  constructor(private gameService: GameService) { }

  ngOnInit() {
    this.gameService.getGames().subscribe(
      (games) => this.games = games
    )
  }

}
Now it is necessary to load the data into the component and display it in the UI. In Angular you would iterate this via the games-list component using the ngFor directive. You could also use this directive in NativeScript, but it is easier to use ListView in mobile applications. A list that displays all our games can be implemented as follows:
games-list.component.html
<ListView class="list-group" [items]="games" (itemTap)="onItemTap($event)">
    <ng-template let-game="item">
        <GridLayout columns="*,  *, *" padding="15">
            <Label textAlignment="center" col="0" [text]="game.homeTeam"></Label>
            <Label textAlignment="center" col="1" text="gegen"></Label>
            <Label textAlignment="center" col="2" [text]="game.awayTeam"></Label>
        </GridLayout>
    </ng-template>
</ListView>
You can easily see that NativeScript does not use the standard HTML syntax but its own XML schema for styling the UI. This ensures that only the components defined by NativeScript can be used. <div> and <h1> – tags can therefore not be used to style the UI. This restriction means that you cannot completely individualise your user interface.
Implementation of the list details
What do you do now to switch to a new page by clicking on a certain item, so that you get the details of the corresponding game? For navigation within the app, in NativeScript you can use the so-called RouterExtension. This is very similar to Angular Routing, but optimised for mobile navigation, so that, for example, a “typical” transition animation can be seen when switching to a new page. Please register an EventListener to the ItemTap event of the ListView:
games-list.component.html
<ListView class="list-group" [items]="games" (itemTap)="onItemTab($event)">
    …
</ListView>
Now navigate to the games-list component on game details to pass the ID of the selected game:
games-list.component.ts
import { RouterExtensions } from 'nativescript-angular/router';

…
export class GamesListComponent implements OnInit {
…

  constructor(private gameService: GameService, private router: RouterExtensions) { }
	…
  public onItemTab(element: any): void {
    const tabbedItemIndex = element.index;
    this.router.navigate(['/game-detail'], { queryParams: { id: this.games[tabbedItemIndex].id } });
  }

}
Of course the game-detail route must be added in the routing component:
app-routing.ts
import { NgModule } from "@angular/core";
import { NativeScriptRouterModule } from "nativescript-angular/router";
import { Routes } from "@angular/router";
import { GamesListComponent } from "./games-list/games-list.component";
import { GameDetailComponent } from "./game-detail/game-detail.component";

const routes: Routes = [
    {path: 'games-list', component: GamesListComponent},
    {path: "game-detail", component: GameDetailComponent}
    {path: '', redirectTo: '/games-list', pathMatch: 'full'},
    {path: '**', component: GamesListComponent }
];

@NgModule({
    imports: [NativeScriptRouterModule.forRoot(routes)],
    exports: [NativeScriptRouterModule]
})
export class AppRoutingModule { }
Now that you have created the corresponding component with
ng generate component game-detailyou can run the app. When you click on an item on the next page, you should see a button indicating that the game-details component exists.
Implementing the game-detail component is relatively easy. Via the ActivatedRoute service you can get the ID, in order to subsequently retrieve the game details for this ID in the GameService:
game-detail.component.ts
import { Component, OnInit } from '@angular/core';
import { ActivatedRoute } from '@angular/router';
import { GameService } from '../game.service';
import { Game } from '../games-list/game.type';

@Component({
  selector: 'ns-game-detail',
  templateUrl: './game-detail.component.html',
  styleUrls: ['./game-detail.component.css'],
  moduleId: module.id,
})
export class GameDetailComponent implements OnInit {

  public game: Game

  constructor(private route: ActivatedRoute, private gameService: GameService) { }

  ngOnInit() {
    const gameId: number = this.route.snapshot.queryParams['id'];
    this.gameService.getGameById(gameId).subscribe(
      (game) => this.game = game
    )
  }

}
game.service.ts
export class GameService {

  constructor(private http: HttpClient) { }

…

  public getGameById(gameId: number): Observable<Game> {
    return this.http.get<any>(`https://www.openligadb.de/api/getmatchdata/${gameId}`).pipe(
      map((val) => {
        return {
          id: val.MatchID,
          homeTeam: val.Team1.TeamName,
          awayTeam: val.Team2.TeamName,
          homeTeamScore: val.MatchResults.length > 0 ? val.MatchResults[0].PointsTeam1 : undefined,
          awayTeamScore: val.MatchResults.length > 0 ? val.MatchResults[0].PointsTeam2 : undefined,
          date: new Date(val.MatchDateTimeUTC), league: val.LeagueName,
          matchday: val.Group.GroupName
        }
      })
    );
  }
}
And now you display the information accordingly:
game-detail.component.html
<StackLayout *ngIf="game != undefined" class="text-padding">
    <Label text="Am {{game.date | date}} spielten in der Liga {{game.league}} am {{game.matchday}} {{game.homeTeam}} gegen {{game.awayTeam}}" textWrap=true></Label>
    <Label text="Das Endergebnis lautet {{game.homeTeamScore}} : {{game.awayTeamScore}}"></Label>
</StackLayout>Do you perhaps want to set a general inner distance between the two labels of 50 pixels?
game-detail.component.css
.text-padding {
    padding: 50px;
}
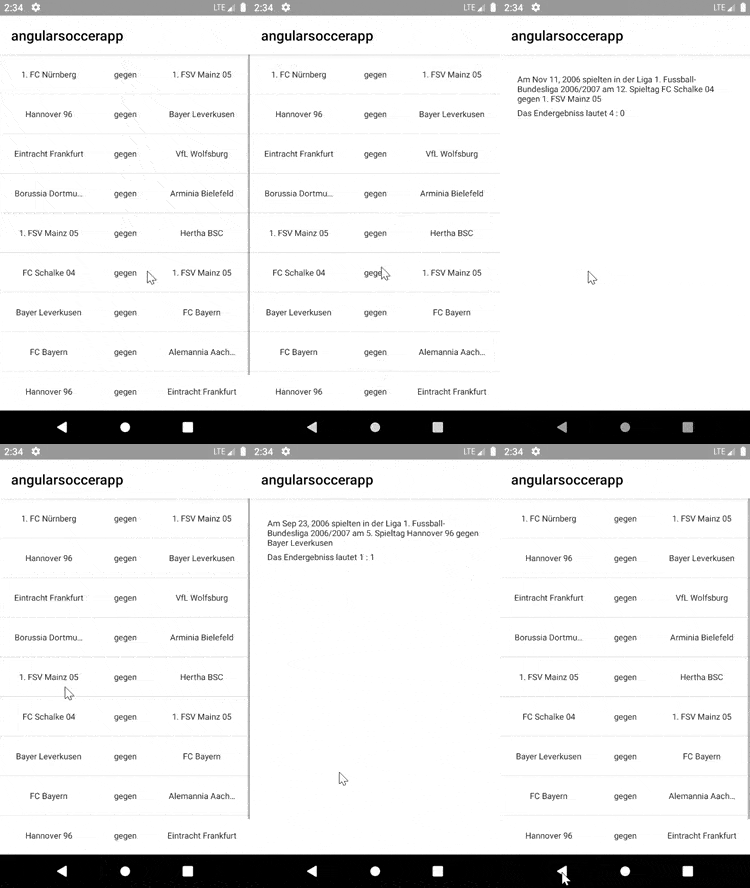
Your application is already created. And this is how it should work now:
Conclusion
Especially if you come from the web environment and already have experience with Angular (or other web technologies), NativeScript offers relatively large advances in a short time. Getting started and the first steps are much easier than with Flutter, for example. However, with the increasing size of our project we also felt the limitations of the framework. For example, NativeScript is partially limited in styling and individual modification of the components.
In order to be able to use additional functionalities and mobile-specific features (e.g. the camera), NativeScript offers a plugin system with which these can be integrated. We have also noticed a few times with the plugins that the standard functions work, but that problems can occur when more individual solutions are needed. For example, we wanted to send images to a server in the application, but sending files is not (yet) supported by NativeScript. Therefore we used the plugin nativescript-background-http, which offers a corresponding functionality. With the help of the plugin we could upload the images. When we subsequently wanted to implement authentication using JWT tokens, it turned out that nativescript-background-http does not support the Angular interceptor and we had to think of a workaround for the implementation again.
So my tip is: Before you decide to use NativeScript, you should carefully evaluate how individual your application will be. For a simple application that loads, prepares and displays data, NativeScript is a highly recommended alternative. However, if design ideas are to be implemented or individual solutions are required, I would recommend taking a look at Flutter.
Notes:
[1] My blog post: Create smartphone applications with Flutter
[2] Together with the Berlin School of Economics and Law (HWR Berlin), t2informatik is once again offering a training position as part of a three-year dual study program in the field of computer science. Click here for details in German.
[3] API of OpenLigaDB: https://www.openligadb.de/
You can find two more posts from Mark Heimer within the t2informatik Blog:

Mark Heimer
Mark Heimer works at t2informatik as a junior developer. He previously studied computer science at the Berlin School of Economics and Law. He writes about some of his experiences here in the blog.


