CI/CD pipeline on a Raspberry Pi – Part 4
The 4th and last part of the experiment, to set up a CI/CD pipeline on a Raspberry Pi, deals with the remaining two projects from the build process: build-server and deploy-application. And it’s about email notification and testing the implemented pipeline. And last but not least I would like to give you my conclusion and an outlook.
Let’s start with the project “build-server”:
Project build-server
The “build-server” project is created in the same way as the “build-client” project: in Jenkins, click on “Create element” on the main page. Fortunately, you can save some time and work by selecting the “build-client” project under “Copy from”. This will simply copy all settings and build steps from your previous project:
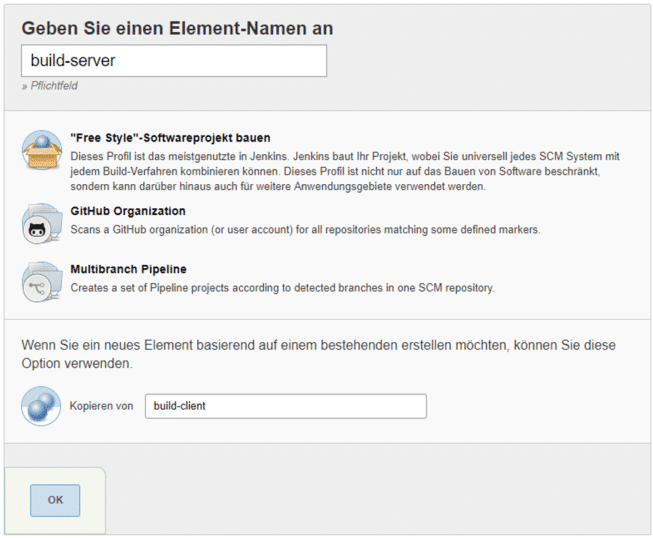
After clicking on “Ok” you will be taken to the configuration page of the project. Remove the check mark “Query Source Code Management System” under “Build Trigger” and set the check mark for “Start Build after other projects have been built”. Then enter “build-client” and select the option “Only trigger if the build is stable”. This will automatically start this build if “build-client” has run successfully.
In the section “Build procedure” edit the script window to test the server:
cd src/server/ReportGenerator.Tests
dotnet restore
dotnet build
dotnet test --no-build -l "trx;LogFileName=TestResult.trx" || true
cd ../../../
At this point the test project is created, then the Testrunner is started and the result is saved in an MSTest-Result-file, whereas by default the execution path is saved in the subfolder TestResults.
Next, you should provide the client in the server’s wwwRoot so that the integrated application can be uploaded as a package to a Web server. But how do you get a client now? It was created in a separate build job, wasn’t it? Therefore you can use a helpful Jenkins plugin called “Copy Artifact Plugin”. Use the name search on the main page at “Manage Jenkins” → “Manage Plugins”. Please install the plugin by simply following the instructions on the interface.
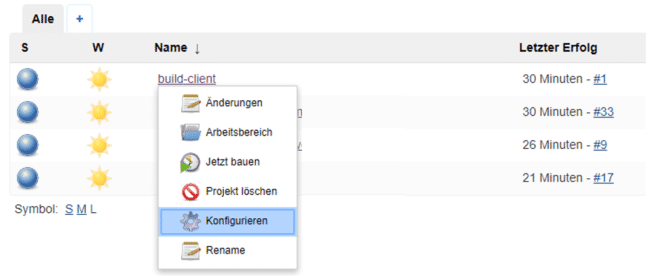
You can quickly return to the configuration page from the main page by pressing the small triangle next to the name in the list of build jobs and selecting “Configure” from the dropdown:
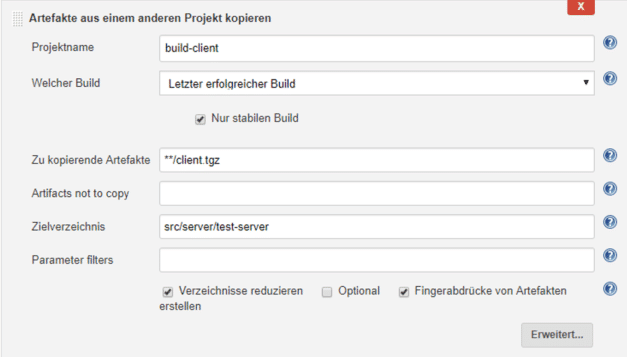
After the “Execute Shell” step, paste the build step via “Copy artifacts from another project”. The source project is “build-client”. The target directory is the server directory:
Now add a last build step, which is once again of the type “Execute Shell”:
cd src/server/test-server

# extract client and pack to wwwRoot folder
mkdir -p wwwRoot
tar -xzf client.tgz -C wwwRoot
# build self-contained dotnet core application with frontend bundled
dotnet publish -c Release -f netcoreapp2.1 -o "bin/publish" --self-contained -r win-x86 -v normal

# pack application to compressed file.
cd "bin/publish"
tar cvfz application.tgz ./*

cd ../../../../../
In the previous step, you copied the “client.tgz” artifact to the “src/server/test-server” folder so that it could be unpacked into the wwwRoot folder. Then the application was built with the command line tool “dotnet publish” as “self-contained” application and made available in the folder “bin/publish”.
The following call of “tar” stores the whole package as “application.tgz” in the folder src/server/test-server/bin/publish.
Finally you have to save the created application as a build artifact and publish the test result of the test run. For the latter you need another Jenkins plugin called “MSTest Plugin”. Please install it from the Jenkins configuration page before continuing.
Now you need two post build actions: “Archive Artifacts” and “Publish MSTest test result report”. Configure the steps as shown in the image below:
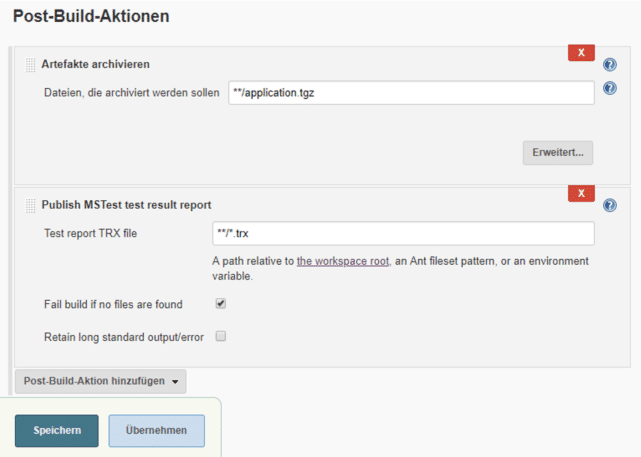
Great, your “build-server” job is now configured and should produce test results and deposit a finished application as a build artifact. You can also try out whether the “build-server” job starts automatically when you start the “build-client” job.
Project deploy-application
The last part of the pipeline is responsible for uploading the built web application to a web server via FTP. The target for a .NET Core application can be an Internet Information Service (IIS) in your infrastructure, an Azure WebApp or any cloud provider. In my case, I provisioned an application on a third-party provider called A2 Hosting – which is easy to implement with FTP at this point. Again, Jenkins offers a suitable plugin, so this step only needs to be configured. Please install the plugin “Publish Over FTP”.
Once the installation is complete, go to “Manage Jenkins” → “Configure System”. In the section “Publish over FTP” you configure the access data to the FTP server. A click on “Test Configuration” ensures that the connection is set up correctly.
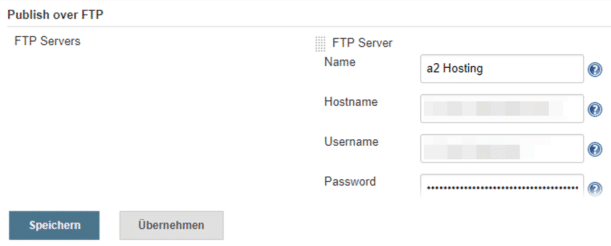
After clicking on “Save” you can return to the main page and create the next project. This is again a “Free Style” project with the name “deploy-application”, but this time it is not based on a previous project.
This project is something else, because here you don’t need the source code anymore, only the created build artifact from the project “build-server”. Therefore everything remains empty within “Source Code Management”. The build trigger is “Start build after other projects have been built”. Just type “build-server” into the input field and select the option “Only trigger if the build is stable”.
In the Build Procedure section, insert “Copy artifacts from another project” as the first step:
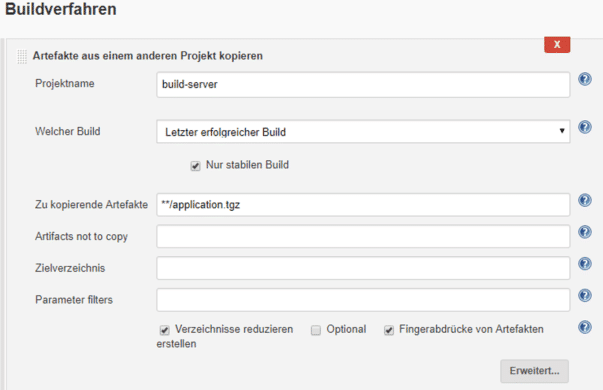
After that you need a step “Execute shell” to unpack the artifact and prepare the upload. Here is the script content:
rm -rf upload
mkdir upload
tar xf application.tgz -C upload
Here only one directory is created and the integrated application is unpacked. The next step is to upload the application via FTP. Simply use the build step “Send files over FTP” from the “Publish over FTP” plugin. Select a configured connection under the global settings and choose source files and destination folders on the FTP. That is all:
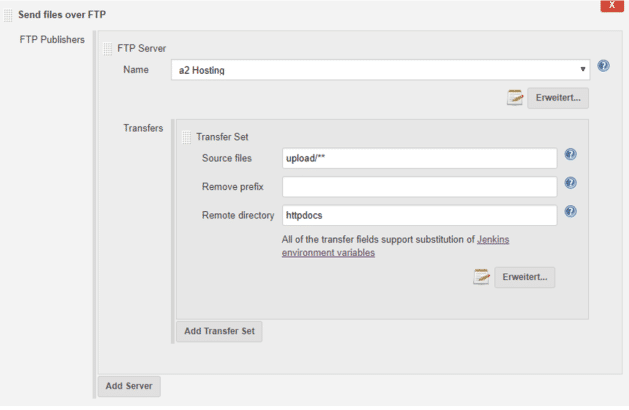
Well done! You now have a fully functioning CI/CD pipeline on your Raspberry Pi.
E-mail notifications
As a icing on the cake, you can now set up an e-mail notification for a successful or faulty build. All you need to do is configure your e-mail server under “Manage Jenkins” → “Configure System” in the “Extended E-Mail Notifications” section and set “Default Triggers” to automatically send e-mails to whoever you want.
Testing the pipeline
Does the CI/CD pipeline work as hoped? Of course you should test it now. Simply start the build process on the client; after a few minutes you should see a successful build and upload on the target system.
As a further use case, you should also check whether the pipeline also reacts in the event of an error. To do this, you need to take a few steps. First, create a Github account and fork the repository: https://github.com/PFriedland89/ci-cd-test-application. This will clone and reference the Github repository to your Github account. This gives you the chance to make changes to the application.
And now you have to change the source code management settings to your repository in each project. To do this, go to the configuration of each of your projects and change the URL under Source Code Management accordingly. Start the build chain for testing to see if the conversion worked.
At this point, you can clone your fork to your computer so that you can now extend the application; for example, it could output three strings instead of two. Change the file src/server/test-server/Controllers/ValuesController.cs to the method Get() as follows:
[HttpGet]
public IActionResult Get()
{
    return Ok(new string[] { "value1", "value2", "value3" });
}
The third string should be visible on the interface after the build. Now push the whole thing on the master branch and watch Jenkins. You will see that “build-client” is triggered automatically and the CI/CD pipeline starts.
However, you will also notice that the application is not deployed because the build job “build-server” fails. If you have set up your email notifications, you will even be notified by email. If you take a look at the build job, you will see that a test failed:
Expected okResult.Value to be a collection with 2 item(s), but {"value1", "value2", "value3"}"
"contains 1 item(s) more than"
"{"value1", "value2"}.
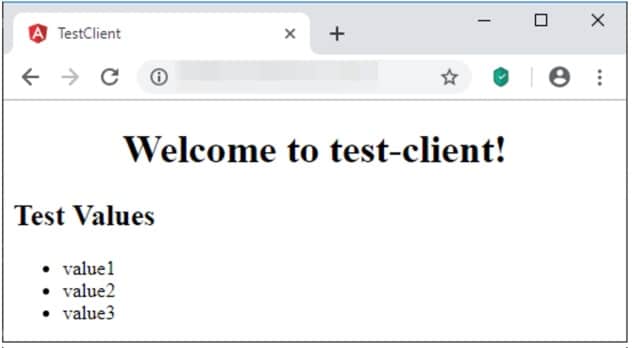
A look at the application reveals that it was not deployed as desired:
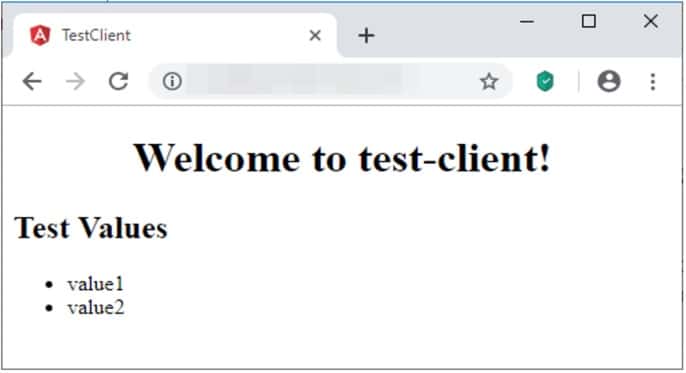
There is a unit test that tests the return value of the controller and has not been updated along with the code change. You can do this by changing the src/server/test-server.tests/Controllers/ValuesControllerTests.cs:
okResult.Value.Should().BeEquivalentTo(new[] {
    "value1", "value2", "values3"
});
If you now push this change, the build pipeline is restarted and the desired result can be seen after a few minutes:
My conclusion
CI/CD is a popular topic and in my work as a software developer and software architect I was able to implement various pipelines, e.g. with the Team Foundation Server. In my opinion it is a very useful concept to ensure continuous integration and to focus on finished features. Essential prerequisites for this are unit and ideally even integration tests, as well as a stable, sustainably implemented automation of build and deployment.
Overall, a CI/CD pipeline on a Raspberry Pi works surprisingly well – better than I expected. The Raspbian Lite Stretch operating system boots within seconds, the Jenkins server is available after about 20 seconds. Due to the fact that everything can be administered with a full-fledged Linux system, there is virtually everything available in terms of tooling that a “big box” would provide.
However, there are also some limitations: The performance is comparatively limited. Larger applications, especially I/O- and CPU-heavy operations, react rather sluggishly. The best example is compiling the SASS dependency using C++. The “npm install” takes about 40 seconds if everything is already present. This is much faster on a full-fledged machine. Therefore the use seems rather unsuitable for large systems.
The most worrying thing is the low RAM (1 GB). In my experiment it was big enough, but with hungrier applications the Raspberry Pi could quickly reach its limits. Due to its ARM architecture, it may also restrict certain technologies; for example, if no SDK is available for ARM, a pipeline is difficult to implement on the Raspberry Pi.
The work with the Jenkins web interface is very pleasant for me, even if it reacts a little slow at times, it was quite fast overall. If you now consider that we didn’t use the Jenkins build node feature at all during the experiment – Jenkins can also distribute its builds to other instances instead of sacrificing its own computing capacity – then this almost screams for using a separate Pi for the server or the frontend per build slot. Multiple parallel builds could also be implemented and deployed on different stages at the same time. This approach could be scaled arbitrarily.
In addition, Jenkins also offers its own new concept for creating CI/CD pipelines with the appropriate name “Pipeline”. The pipeline is then described as a whole in a declarative or scripted syntax and also versioned directly in Git. For more information, please refer to the official documentation at https://jenkins.io/doc/book/pipeline/.
Thank you for your interest in my experiment. For me it was a success. For you too?
Notes:
Here you can find the other parts of Peter Friedland’s series:

Peter Friedland
Software Consultant at t2informatik GmbH
Peter Friedland works at t2informatik GmbH as a software consultant. In various customer projects he develops innovative solutions in close cooperation with partners and local contact persons. And from time to time he also blogs.


