CI/CD pipeline on a Raspberry Pi – Part 1
- Full flexibility with available software and software versions
- The costs are lower compared to rented servers including root access
- Access data to the target infrastructure is available in the local network and not in the cloud
- Geek factor!
Just the last point drove me to try the whole thing on a weekend – in addition I finally had a reason to order a Raspberry Pi and use it for something useful.
Ordering Raspberry Pi
If you do not already own one, I recommend you to buy the current model: Raspberry Pi 3 B+. This is the most powerful model with a 64-bit ARM quad-core processor that clocks at 1.4GHz. Furthermore the Pi has 1GB RAM, Ethernet, WLAN, 4x USB 2.0 and an HDMI port. You can buy the Pi quite easily via Amazon. I recommend to buy a case with a suitable power supply – mine even has a small active fan, which is really very quiet in slow mode. Furthermore I recommend to order a sufficiently large SD card, I bought a 64GB one – after all there should be enough space for the builds.
Putting hardware into operation
If, like me, you have bought a suitable case, it would be best if you were to set it up now, then the Pi is well protected.
Installing and configuring the operating system
The Raspberry Pi can be operated with different operating systems: Windows 10 IOT, Raspbian Desktop, Raspbian Lite or Ubuntu Core. For our scenario a slim Linux without a graphical desktop is sufficient – so Raspbian Lite would be a good choice.
Download image
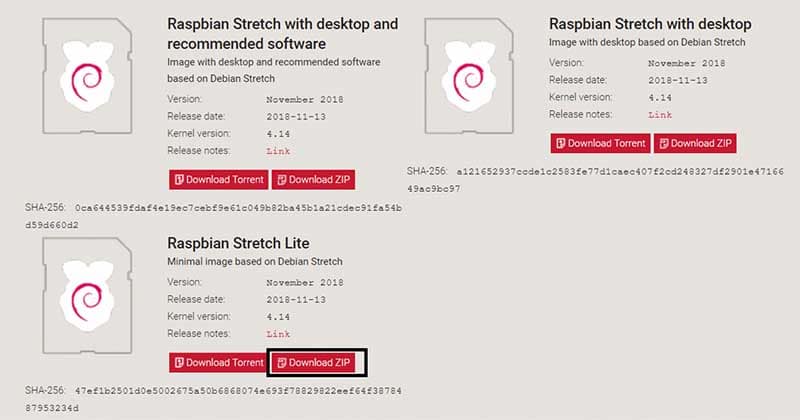
Just go to the official site (https://www.raspberrypi.com/software/) and search for “Raspbian Stretch Lite”. Then click on “Download Zip”:

Burn image to SD card
For this you need a suitable card reader and an appropriate connection to your computer. If you don’t have a port for it, you can buy suitable USB adapters for it. After you have connected the SD card to the computer, you have to write the image on the SD card. Depending on which operating system you are currently running, you may need to use other tools. Here is a small recommendation for UI-based tools:
- Windows: Universal USB Installer (https://www.heise.de/download/product/universal-usb-installer-92399)
- Mac OSX: Etcher (https://etcher.balena.io/)
- Linux: gnome-disk-utility (get from package manage)
After you have successfully copied the image to the SD card, you can immediately continue and configure the Raspberry Pi.
Configuring Raspberry
For an initial setup you need to connect a keyboard and a screen to the Raspberry Pi. Use the appropriate USB or HDMI ports for the keyboard and monitor. Important: Connect the peripherals before starting the Pi by connecting the power supply.
When the Pi is powered up, the boot process should start automatically and invite a command line to login. The credentials are as follows:
Login: pi
Password: raspberry
Note: Since the keyboard layout is standardized in English, if you want to use a German keyboard layout, the Y and Z keys are reversed – so the password is “raspberrz”.
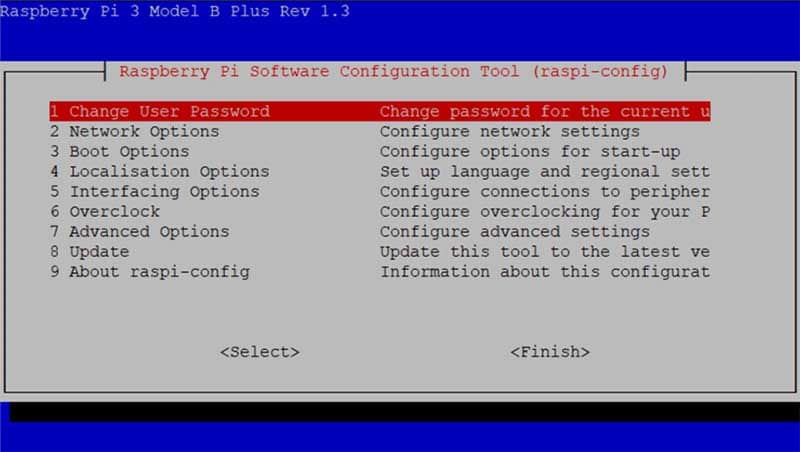
Now configure the Pi with a tool called “raspi-config”. Enter the following into the terminal:
sudo raspi-config If you have a German keyboard layout, enter the following:
sudo raspißconfigNow the raspberry configuration menu opens.

Configuring the Keyboard Layout
If you do not accidentally use an English keyboard, you should adjust the keyboard layout. Use the arrow keys to select “4 Localisation Options” and then press Enter.
In the following menu select “I3 Change Keyboard Layout” and as keyboard type “Generic 105-key (Intl) PC”. Now you have to select the keyboard layout in the next dialog. If you use a German layout, select the option “Other” and in the following dialog the country “Germany”. Then select the keyboard layout “German”.
In the following dialogs you can select the standard options “The default for the keyboard layout” and “No compose Key” and confirm with Enter. If you now answer the next option simply with “No”, you have configured your keyboard and can return to the main menu on the Pi.
Configuring SSH
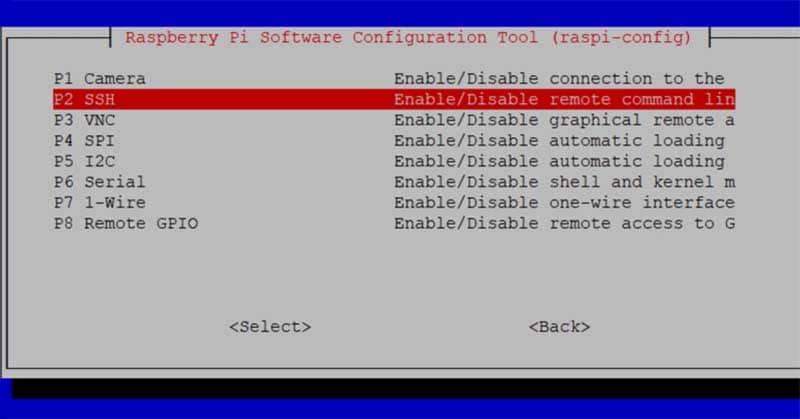
Since we only want to control the Pi via SSH, we still have to activate this option. Select “5 Interface Options” in the main menu and then “P2 SSH”.

Answer the following question whether you really want to activate SSH with “Yes” and confirm the entry with Enter.
Change password
To prevent everyone from accessing the Raspberry Pi, change the password using the “1 Change User Password” menu item.
Enlarge partition
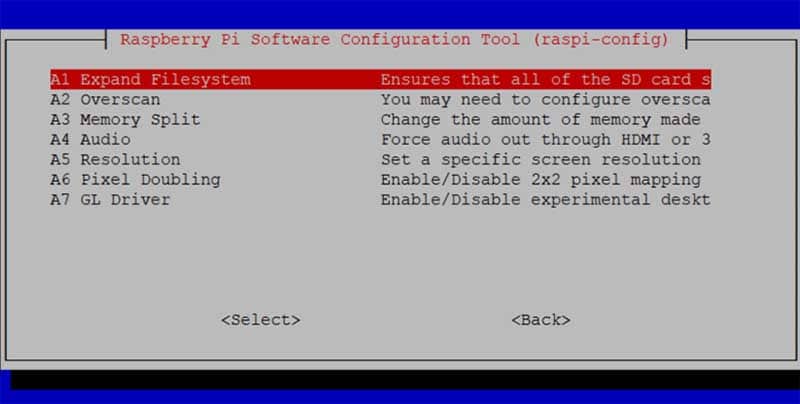
Finally, enlarge the partition so that the entire SD card can be used. Navigate to the menu item “7 Advanced Options” and select “Expand Filesystem”. Then confirm the dialog with “Ok”.

Restart
You are now ready with the configuration and can leave the main menu. You can do this simply by using the arrow key twice on the right to navigate to “<Finish>” and confirm with Enter. Now you can restart the Pi:
sudo shutdown –r nowNow you should be able to log in normally with a suitable keyboard layout. The user name remains unchanged, only the password is now of course the new one you assigned.
Test SSH access
Now at the latest you should integrate the Pi into your local network, the easiest way of course is with an Ethernet cable. Important: If you are using your Pi in a WLAN, you will have to make settings via raspi-config. Since I do everything via LAN, I have saved myself the steps.
Now please test the SSH access. First you should find out the IP address of the Pi:
Hostname –IFor example, I get 192.168.0.55. Important: It is a good idea for the Pi to get a fixed IP address from the router so that you can always connect to the same address and don’t have to struggle to find out which address was assigned.
After that you can connect to a SSH tool (Windows Putty, Mac and Linux have a SSH client for the command line by default). I login via pi@192.168.0.55 and with my password. If everything worked out for you, you can switch off the Pi, lock mouse and keyboard again, and continue working comfortably from your computer.
In part 2 of the experiment I describe the installation of a build server. Will you be back again and join in?
Notes:
Here you can find the other parts of Peter Friedland’s series:

Peter Friedland
Software Consultant at t2informatik GmbH
Peter Friedland works at t2informatik GmbH as a software consultant. In various customer projects he develops innovative solutions in close cooperation with partners and local contact persons. And from time to time he also blogs.


