3D visualisation with VTK and Avalonia UI
It is well known that pictures say more than a thousand words, and sometimes they are even indispensable, for example in medical applications and the display of CT images in three-dimensional space. Both in research and in practice, the Visualisation Toolkit (VTK) has established itself as a powerful open-source C++ library for 2D and 3D visualisation of scientific data. [1] Outside of research, however, this visualisation must also be embedded in modern graphical user interfaces (GUI). Avalonia UI is such a modern GUI library and is also cross-platform. [2]
I used to dismiss the buzzword ‘cross-platform’ until I spent two years working on a project that involved making a tool landscape run on both Windows AND Linux. This raises the question of how Avalonia UI’s platform independence can be combined with the diverse possibilities offered by VTK.
Embedding VTK in an Avalonia UI control
Combining VTK and Avalonia UI is no longer a problem, as this can be done very easily with ActiViz [3]; ActiViz offers the option of integrating VTK views as Avalonia UI controls. Period. In addition, support is fast and friendly, and cooperation with other products such as CMake (the quasi-standard for describing C++ build environments) [4] ensures long-term and reliable further development.
How does it work in detail? Let’s look at a small example consisting of an Avalonia UI application and a simple VTK visualisation. [5] The entire GUI consists exclusively of the Avalonia UI control:
<Window x:Class="BlogVTKUndAvalonia.MainWindow" someNotImportantBoilerPlateCode
        Title="VTK_Avalonia">
    <AvaloniaControls:RenderWindowControl Name="VTKControl" />
</Window>
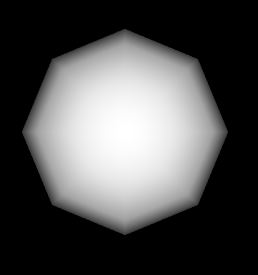
We have a data source (vtkSphereSource generates a polygon mesh that looks like a sphere) and a mapper (vtkPolyDataMapper) that prepares the geometric data for display.
Optionally, we could insert further processing steps here, such as filters, transformations, etc. Next, an actor (vtkActor) is created that contains the mapper data and is displayed in the renderer (vtkRenderer). The renderer takes over the scene, displays the actor object and passes it to the Avalonia control. [6]
public partial class MainWindow : Window
{
    public MainWindow()
    {
      AvaloniaXamlLoader.Load(this);

      var mainView = this.FindControl<RenderWindowControl>("VTKControl");
      var renderWindow = mainView?.RenderWindow;
      var renderer = vtkRenderer.New();

      renderWindow?.AddRenderer(renderer);
      var interactorStyle = vtkInteractorStyleTrackballCamera.New();
      renderWindow?.GetInteractor().SetInteractorStyle(interactorStyle);

      var src = vtkSphereSource.New();
      var mapper = vtkPolyDataMapper.New();
      mapper.SetInputConnection(src.GetOutputPort());
      var actor = vtkActor.New();
      actor.SetMapper(mapper);
      renderer.AddActor(actor);
    }
}
For those who can’t translate Avalonia UI code and VTK pipeline in their heads, here’s the visual result: 😉
Figure 1: Polygon mesh that looks like a sphere
Remark: Complete platform independence is usually more difficult to achieve in practice than some providers would have you believe. For our example, this means that the application requires additional information about how rendering should be used under specific operating systems:
AppBuilder.Configure<App>()
  .UsePlatformDetect()
  .WithInterFont()
  .LogToTrace()
  .With(new Win32PlatformOptions {
      RenderingMode = new[] { Win32RenderingMode.Wgl }
  });
From embedding to combining with reusable UserControls
The interaction between VTK components and Avalonia UI controls becomes really interesting when you build reusable UserControls. So let’s use our 3D sphere, insert a slider and bind its value changes to a function:
.axaml
<UserControl x:Class="ReusableVTKControl" oneNotImportantBoilerPlateCode>
    <Grid RowDefinitions="Auto,*">
        <Slider Name="Slider"
                Grid.Row="0"
                Maximum="100"
                Minimum="0"
                Orientation="Horizontal"
                ValueChanged="OnSliderValueChangedFromSlider" />
        <AvaloniaControls:RenderWindowControl Name="VTKControl"  Grid.Row="1" />
    </Grid>
</UserControl>
.axaml.cs
private void OnSliceNumberChangedFromScene(double sliderPosition)
  => SliderPosition = sliderPosition;
User input can be customised in the InteractorStyle connected to our RenderWindow by registering EventHandlers (bonus points if you also deregister them and avoid memory leaks):
style.MouseWheelBackwardEvt += (_, _) => { SliderPosition += 0.1; };The SliderPosition is bound to a custom StyledProperty created by Avalonia UI, and we can override the OnPropertyChangedEvent:
public static readonly StyledProperty<double> SliderPositionProperty =
    AvaloniaProperty.Register<ReusableVTKControl, double>(
      nameof(SliderPosition),
      0.5);
public double SliderPosition
{
    get => GetValue(SliderPositionProperty);
    set => SetValue(SliderPositionProperty, value);
}

protected override void OnPropertyChanged
  (AvaloniaPropertyChangedEventArgs change)
{
    _renderer.SetBackground(0.0, SliderPosition, 0.0);

    //Constructor: this.FindControl<Slider>("Slider")
    _slider.Value = SliderPosition * 100;
    _renderWindow.GetInteractor().Render();
    base.OnPropertyChanged(change);
}
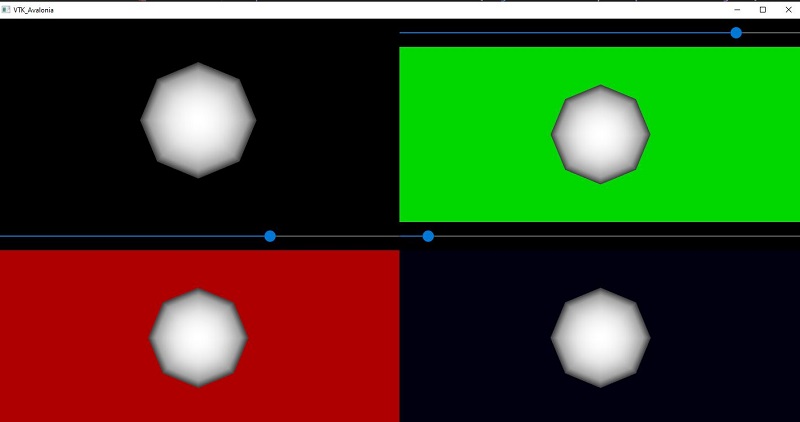
Now we have a UserControl where we can move a slider or the synchronised mouse wheel and the background colour of our 3D sphere changes.
Any Avalonia UI controls (in this case, the slider) can influence each other bidirectionally using VTK visualisation (rotate the mouse wheel above the VTK window), thereby implementing complex, self-contained UserControls. With additional StyledProperties and change.Property within OnPropertyChanged, these controls can then be easily configured from outside.
In the end, our application could integrate our user control three times and select the colour change each time, which would then look as follows:
<Grid ColumnDefinitions="*,*" RowDefinitions="*,*">
    <AvaloniaControls:RenderWindowControl Name="VTKControl"
                                          Grid.Row="0"
                                          Grid.Column="0" />
    <BlogVtkUndAvalonia:ReusableVTKControl Grid.Row="1"
                                           Grid.Column="0"
                                           ColorChange="Red" />
    <BlogVtkUndAvalonia:ReusableVTKControl Grid.Row="0"
                                           Grid.Column="1"
                                           ColorChange="Green" />
    <BlogVtkUndAvalonia:ReusableVTKControl Grid.Row="1"
                                           Grid.Column="1"
                                           ColorChange="Blue" />
</Grid>
Figure 2: Polygon network with colour changes
Data flow in a clean architecture
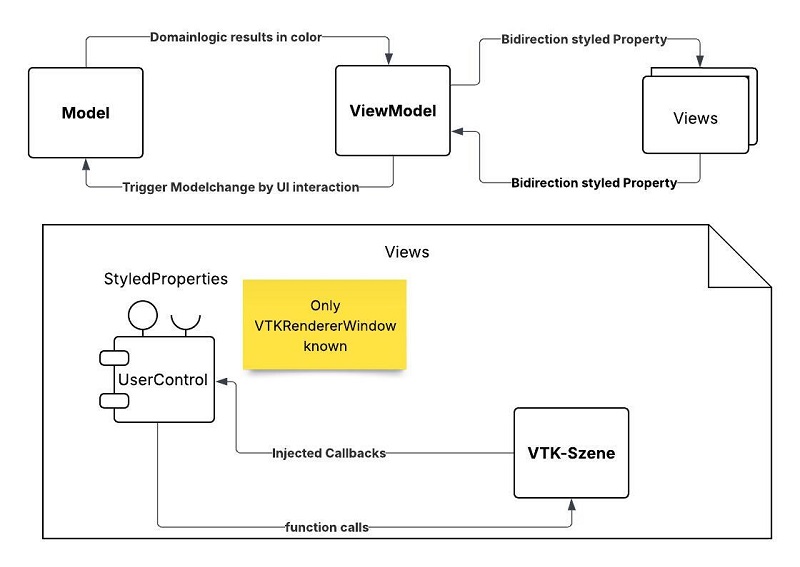
More complex applications often use the Model–View–ViewModel (MVVM) architecture with Avalonia UI, into which our UserControls fit well:
- A domain logic calculates a value in the model (e.g. the colour green for results below a threshold value, the colour red for a value above it), which is passed to the ViewModel.
- The ViewModel remains up to date by means of styled properties, especially since the views can also report changes to the ViewModel via the properties, which then trigger changes in the model.
The next step could be to encapsulate the VTK scene as part of the UserControl in its own class. The UserControl would only know that it contains a VTKRendererWindow, but would no longer know how the VTK scene is displayed. Callbacks could be used to completely decouple the scene, which is important because a VTK scene can become arbitrarily complex, for example, due to dozens of actuators.
The advantage is obvious: following the single-response principle, the VTK scene is truly independent; replacing the slider with a numeric input field, for example, or changing the initial camera view only triggers changes to one component.
Figure 3: Data flow in a clean architecture
Conclusion: 3D visualisation with VTK and Avalonia UI
As you have seen from this small example, VTK and Avalonia UI work well together. This is hardly surprising, as the power of many years of C++ library development meets modern UI technology. In our daily practice, this is a great advantage, as customers who work with CT images in a medical context, for example, and require axial, sagittal and coronal views benefit greatly from it. [7]
Notes:
[1] VTK: The Visualisation Toolkit
[2] Avalonia UI: The Future of .NET UI
[3] ActiViz: 3D Visualisation Library for .NET C# and Unity
[4] CMake: Cross-platform open source tool for automating the software build process
[5] Here you will find the entire code for the sample application; however, you will need a licence from ActiViz.
[6] 3D visualisation is a field of expertise in its own right. For a more in-depth introduction to the topic, we recommend the VTK Textbook.
[7] The joint success story of Dr. Sennewald Medizintechnik and t2informatik shows how such an application is created in practice.
Here you can find an article about Avalonia UI and the development of a cross-platform WPF application with .NET Core.
Would you like to discuss the topic as communicator? Then feel free to share the article in your network.
Jan Kasper has published another article on the t2informatik Blog:

Jan Kasper
Jan Phillip Kasper is a software developer. He started out in the embedded sector with C++ and later switched to C# because of the powerful tooling. His first technical love is unit testing, and he takes quiet delight in tracking down bizarre errors in system testing. And in his private life? He builds technical toys with his sons and even lets them play with them occasionally.
In the t2informatik Blog, we publish articles for people in organisations. For these people, we develop and modernise software. Pragmatic. ✔️ Personal. ✔️ Professional. ✔️ Click here to find out more.


