Sokoban on a milk carton display
Have you ever heard of a milk carton display? Do you know Sokoban? And can you imagine playing Sokoban on a milk carton display?
I’m often tempted by new ideas to do a bit of tinkering at the weekend. When a colleague from SWIFT.CONSULT¹ told me about their milk carton display, I was immediately excited. They got the inspiration for the display from Tetrapix.²
A milk carton display is an LED panel consisting of 7 x 7 milk cartons, where each milk carton is illuminated with its own LED in a desired colour. There are six of these LED panels in total, which can be arranged to form a common display. A display with a resolution of 21 x 16 or 16 x 21 pixels. With a self-made controller, you could play Tetris, for example, on this display. Or Sokoban.
In case you don’t know the game: Sokoban is a game with different levels in which a character has to move existing boxes to predefined target fields. The player has to be careful not to block his own way, otherwise the game starts all over again. The idea was quickly born that each pixel is a field and the colour of the pixel defines the element: Wall, player, box and target field.
The hardware and software used
What is the setup for the project? The milk carton display consists of RGB LEDs soldered together, cut milk cartons and a breakout board. The whole thing is controlled by an Arduino microcontroller including some other controls for input like joysticks and buttons. The game is programmed in C with the Arduino IDE. The Arduino IDE is more than sufficient for smaller projects, as it offers standard libraries for controlling the peripherals on the one hand and supports the transfer of the programme to the microcontroller on the other.
The virtual development of Sokoban for the milk carton display
What can you do if you don’t happen to have a milk carton display at home? I decided to do the implementation virtually, i.e. to develop the program on a Windows PC, but to separate the access to the display, inputs and system calls from the logic of the game, so that I can easily adapt the implementation to the “real hardware” later on. Since desktop application development is not supported by the Arduino IDE, I used Visual Studio for this.
The development of “sokoban.cpp
The logic in classic C-style is implemented in a single file – the “sokoban.cpp”. Due to the simplicity of the problem, I did not use an object orientation for the game logic and used a proven C++ library called SFML, which provides a framework for windowing and user input processing.
For the inputs and system calls, I opted for a simple solution. For each input and system call there is a function that is implemented in the virtual environment by SFML.
void delay(int32_t milliseconds)
{
  sf::sleep(sf::milliseconds(milliseconds));
}

bool key_left_down()
{
  return sf::Keyboard::isKeyPressed(sf::Keyboard::Key::A);
}

bool key_right_down()
{
  return sf::Keyboard::isKeyPressed(sf::Keyboard::Key::D);
}

bool key_up_down()
{
  return sf::Keyboard::isKeyPressed(sf::Keyboard::Key::W);
}

bool key_down_down()
{
  return sf::Keyboard::isKeyPressed(sf::Keyboard::Key::S);
}

bool key_action_down()
{
  return sf::Keyboard::isKeyPressed(sf::Keyboard::Key::Space);
}
The game logic in the same file below simply uses these functions. This ensures later interchangeability.
void update_game(int16_t elapsedMillis)
{
  position_t target_player;
  position_t target_box;

  target_player.x = player.x;
  target_player.y = player.y;
  target_box.x = player.x;
  target_box.y = player.y;

  if (key_left_down())
  {
    // game logic
  }

  // ...
  delay(100);
}
The virtualisation of the screen
For the virtualisation of the screen, “Adafruit GFX Library” offers good support. The library provides implementations for various displays from the manufacturer Adafruit. The display driver for the milk carton display written by SWIFT.CONSULT implements a C++ interface called “Adafruit_GFX” and thus it makes sense to implement the game logic against this interface. However, you don’t need to implement the interface completely because only a few functions of the interface are used.
Since you need a class that implements the interface Adafruit_GFX, it makes sense to switch from C to C++. The implementation remembers all pixels in an array of 16-bit integers. All methods read from or write to this array. When the display is updated, the array is evaluated and a rectangle is drawn on the display for each pixel using SFML. The implementation is relatively simple as you can see here:
// VirtualDisplay.h

#include "Adafruit_GFX.h"

class VirtualDisplay : public Adafruit_GFX {
private:
	sf::RenderWindow& _window;
	sf::RectangleShape _shape;
	int _width;
	int _height;
	int16_t* _pixels;

public:
	VirtualDisplay(sf::RenderWindow &window, int16_t w, int16_t h);
	~VirtualDisplay();

public:
	void drawPixel(int16_t x, int16_t y, uint16_t color);
	void display();

private:
	unsigned long rgb16_to_rgb32(unsigned short a);
};

// VirtualDisplay.cpp

VirtualDisplay::VirtualDisplay(sf::RenderWindow &window, int16_t w, int16_t h):
	_window(window),
	_width(w),
	_height(h),
	_pixels(nullptr) {
	_pixels = new int16_t[w*h];
	for (auto i = 0; i < w*h; i++) _pixels[i] = 0;
}

VirtualDisplay::~VirtualDisplay() {
	delete[] _pixels;
}

void VirtualDisplay::drawPixel(int16_t x, int16_t y, uint16_t color) {
	if (x < 0 || x >= _width || y < 0 || y >= _height) return;

	_pixels[y*_width + x] = color;
}

void VirtualDisplay::display() {
	sf::Event event;
	while (_window.pollEvent(event)) {
		if (event.type == sf::Event::Closed) _window.close();
	}

	auto size = _window.getSize();

	auto pixelSize = std::min(size.x / _width, size.y / _height);
	auto offsetX = (size.x - pixelSize * _width) / 2;
	auto offsetY = (size.y - pixelSize * _height) / 2;

	_shape.setSize(sf::Vector2f(pixelSize,pixelSize));

	_window.clear(sf::Color::Blue);
	for (auto x = 0; x < _width; x++) {
		for (auto y = 0; y < _height; y++) {
			_shape.setPosition(sf::Vector2f(offsetX + x * pixelSize, offsetY + y * pixelSize));

			auto color = _pixels[y*_width + x];
			auto colorBits = rgb16_to_rgb32(color);
			_shape.setFillColor(sf::Color(colorBits));

			_window.draw(_shape);
		}
	}
	_window.display();
}

unsigned long VirtualDisplay::rgb16_to_rgb32(unsigned short a) {
	unsigned long r = (a & 0xF800) >> 11;
	unsigned long g = (a & 0x07E0) >> 5;
	unsigned long b = (a & 0x001F);
	r = std::lroundf((float)r / 31.0f * 255.0f);
	g = std::lroundf((float)g / 63.0f * 255.0f);
	b = std::lroundf((float)b / 31.0f * 255.0f);
	return 0x000000ff | (r << 24) | (g << 16) | (b << 8);
}
The virtualisation of the frame
The whole thing is still packed into a small frame, quasi as a virtual microcontroller running as a Windows application. The code is also implemented in the “sokoban.cpp” file. Below you can see the entire virtual frame, which is also straightforward:
//----------------------------------------------------------------
// virtual, replaceable input, system calls and display reference
//----------------------------------------------------------------
Adafruit_GFX *tft = nullptr; // filled in main function

void delay(int32_t milliseconds)
{
	// ...
}

// Further functions

//----------------------------------------------------------------
//game logic
//----------------------------------------------------------------

//here is the game logic using input, system calls and tft display reference.
//----------------------------------------------------------------
//Virtual machine running the game inside a win32 shell.
//----------------------------------------------------------------

int main()
{
	sf::RenderWindow window(sf::VideoMode(800, 600), "SFML works!");

	std::unique_ptr<VirtualDisplay> local_tft = std::make_unique<VirtualDisplay>(window, WIDTH, HEIGHT);
	//fill global variable
	tft = local_tft.get();

	setup();

	while (window.isOpen())
	{
		loop();
		local_tft->display();
	}

	return 0;
}
That was all. Simple, isn’t it?
From virtualisation to reality
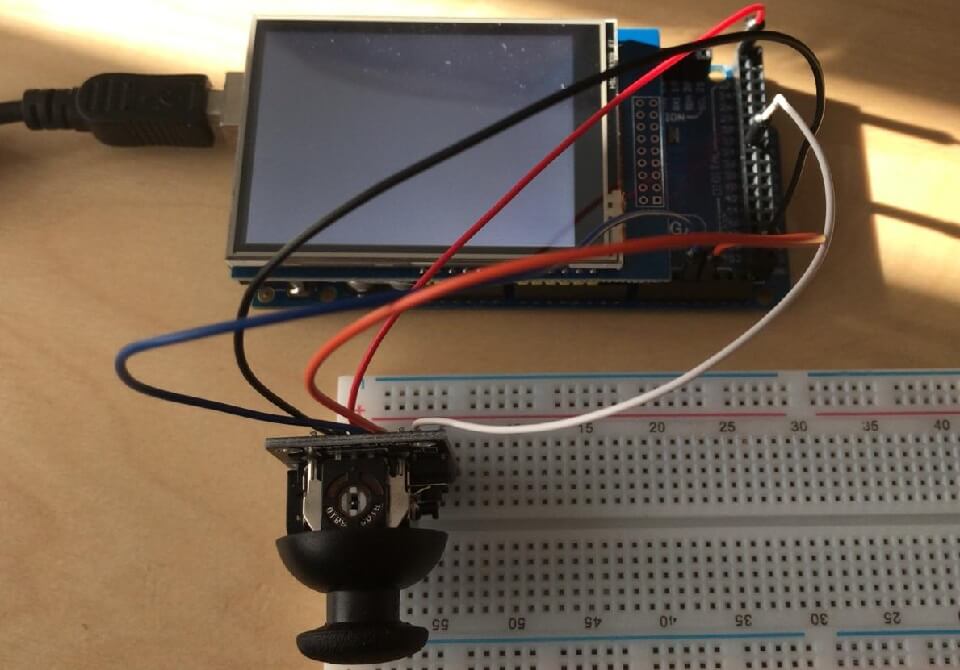
It’s nice when everything works “virtually” as desired, but does it also work in “hard” reality? I have an Arduino Mega at hand. Joystick and buttons are also on my desk. And I was able to quickly get a 2.8 inch TFT LCD shield from Adafruit. Good that everything can be easily connected on a breakout board.
And how do we proceed now? First I rename “Sokoban.cpp” to “sokoban.ino” and swap the implementations for the Adafruit interface, the system calls and the inputs. Here you can find the changes to “sokoban.ino”:
#include <Elegoo_GFX.h>
#include <Elegoo_TFTLCD.h>

#define LCD_CS A3 // Chip Select goes to Analog 3
#define LCD_CD A2 // Command/Data goes to Analog 2
#define LCD_WR A1 // LCD Write goes to Analog 1
#define LCD_RD A0 // LCD Read goes to Analog 0
#define LCD_RESET A4 // Can alternately just connect to Arduino's reset pin

Elegoo_TFTLCD tft(LCD_CS, LCD_CD, LCD_WR, LCD_RD, LCD_RESET);

bool left_down = false;
bool right_down = false;
bool down_down = false;
bool up_down = false;
bool action_down = false;

bool key_left_down()
{
  return left_down;
}

bool key_right_down()
{
  return right_down;
}

bool key_up_down()
{
  return up_down;
}

bool key_down_down()
{
  return down_down;
}

bool key_action_down()
{
  return action_down;
}

//-----------------------------------------------------------------------------------------------
// GAME Implementation
//-----------------------------------------------------------------------------------------------

void setup()
{
  tft.reset();
  tft.begin(0x9341);
  tft.fillScreen(0x0000);

  //load initial level
}

void loop()
{
  int vertical = analogRead(A11);
  int horizontal = analogRead(A12);

  action_down = digitalRead(34) == 0;
  left_down = horizontal < 128;
  right_down = horizontal > 896;
  up_down = vertical > 896;
  down_down = vertical < 128;

  delay(FRAME_TIME_MILLISECONDS);

  //run game logic
In short, setup() and loop() are the functions that Arduino calls. “Setup()” is called once when the microcontroller is started and initialises the Adafruit display. “Loop()” is called repeatedly by the microcontroller in a loop. Here, the ports to which the joystick and buttons are connected are read and button presses are determined. You could even remove the “delay()” function completely, as the same signature is provided directly by the Arduino basic library. The whole thing can be transferred from the Arduino IDE directly to the microcontroller and executed.
Admittedly, 21×16 pixels are very small when the display offers a much higher resolution. Apart from that, however, everything worked for me straight away.
Level management including editor
Sokoban is a game in which the player works his way through the game level by level. Of course, you still have to create these levels in the game. There are various options for this, such as an SD card on which the corresponding XML files are stored. However, I decided on an even simpler solution and stored the levels directly in the code as arrays. The advantage is that the data is directly available and takes up very little space (21 x 16 = 336 bytes per level). The data structure looks like this:
//Block definitions
const int8_t E = 0; // empty
const int8_t W = 1; // wall
const int8_t S = 2; // Start player
const int8_t B = 3; // box
const int8_t T = 4; // target for box
const int16_t LEVEL_COUNT = 9;
const int8_t level_data[LEVEL_COUNT][WIDTH*HEIGHT] = {
  {
    E,E,E,E,E,E,E,E,E,E,E,E,E,E,E,E,E,E,E,E,E,
    E,E,E,E,E,E,E,E,E,E,E,E,E,E,E,E,E,E,E,E,E,
    E,E,E,E,E,E,E,E,E,E,E,E,E,E,E,E,E,E,E,E,E,
    E,E,E,E,E,E,E,E,W,W,W,E,E,E,E,E,E,E,E,E,E,
    E,E,E,E,E,E,E,E,W,T,W,E,E,E,E,E,E,E,E,E,E,
    E,E,E,E,E,E,E,E,W,E,W,W,W,W,E,E,E,E,E,E,E,
    E,E,E,E,E,E,W,W,W,B,E,B,T,W,E,E,E,E,E,E,E,
    E,E,E,E,E,E,W,T,B,S,E,W,W,W,E,E,E,E,E,E,E,
    E,E,E,E,E,E,W,W,W,W,B,W,E,E,E,E,E,E,E,E,E,
    E,E,E,E,E,E,E,E,E,W,T,W,E,E,E,E,E,E,E,E,E,
    E,E,E,E,E,E,E,E,E,W,W,W,E,E,E,E,E,E,E,E,E,
    E,E,E,E,E,E,E,E,E,E,E,E,E,E,E,E,E,E,E,E,E,
    E,E,E,E,E,E,E,E,E,E,E,E,E,E,E,E,E,E,E,E,E,
    E,E,E,E,E,E,E,E,E,E,E,E,E,E,E,E,E,E,E,E,E
  },
  //....
};
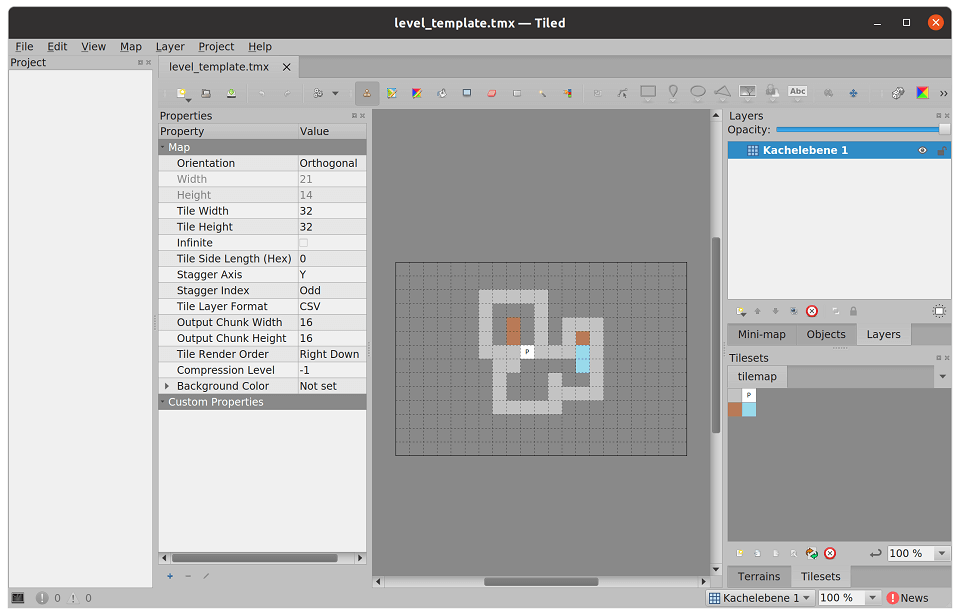
However, it is no fun to create this data completely by hand, so I came up with a small tool chain to be able to generate different levels with reasonable effort. I used the Tiled Map Editor for this.
And now? In the file there is an element <data>. This contains the field information to be replaced, i.e. the numbers that are now to become letters using the search and replace command:
- 0 -> E
- 1 -> W
- 2 -> S
- 3 -> B
- 4 -> T
The last step is to move this data to the end of the array of the variable “level_data” and increase the variable LEVEL_COUNT by one. After compiling and uploading to the microcontroller, everything is ready for testing. Done.
Conclusion
I would like to encourage you to rebuild the project. All the necessary information including documentation in Markdown files can be found here in a Github repository.
I would like to encourage you to rebuild the project. All the necessary information including documentation in Markdown files can be found here in a Github repository.
I had a lot of fun implementing the project. SFML is a home game for me, as I know the library and have experimented with it a lot. You can find a lot of useful information about the hardware at Arduino, so you can certainly get started quickly. And then you control the game on a cute little display with your joystick, then the effort was definitely worth it. I promise.
Notes:
Of course, I would be very happy if the colleagues at SWIFT.CONSULT would test the whole thing on the real display. And what I’m particularly interested in: who manages all the levels?
[1] SWIFT.CONSULT
[2] Tetrapix
[3] Tiled Map Editor
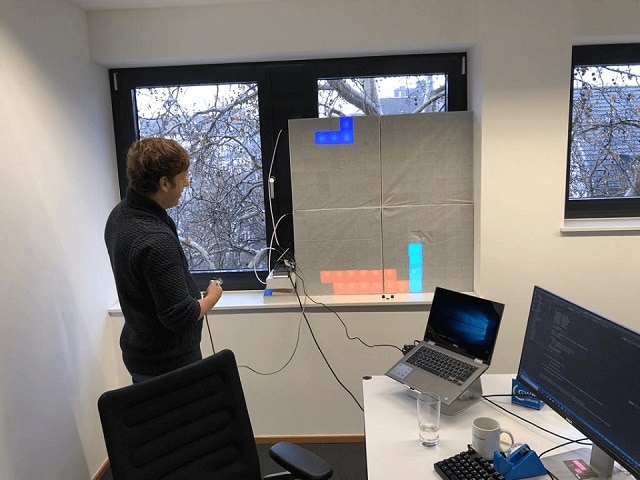
This is what the game Tetris looks like on the milk carton display:
Peter Friedland has published a number of other articles on the t2informatik blog, including

Peter Friedland
Software Consultant at t2informatik GmbH
Peter Friedland works at t2informatik GmbH as a software consultant. In various customer projects he develops innovative solutions in close cooperation with partners and local contact persons. And in his private life, the young father plays the cello in the Wildau Music School orchestra.
In the t2informatik Blog, we publish articles for people in organisations. For these people, we develop and modernise software. Pragmatic. ✔️ Personal. ✔️ Professional. ✔️ Click here to find out more.
